
This post may contain affiliate links. I may earn a small commission off of at NO extra cost to you. For more info, view my Privacy Policy.
I really don’t know what can be cuter than this Gingerbread Man Stuffie!!! This Gingerbread Man Crochet Pattern is a really quick make! He measures about 8” tall and is absolutely adorable!
Not only is the a free crochet pattern, I have even made a complete video tutorial with detailed instructions to show you how to make this cute amigurumi gingerbread man!

You could make several and finish them off different and have a whole gingerbread family! Add a bow and a pink scarf for a gingerbread girl or a gingerbread lady!
I even have some other free crochet gingerbread patterns
He’s the perfect size for a stocking stuffer!
I had some leftover tiny Poms from making my Pom Pom Christmas trees and I thought that they would make the perfect little cheeks and buttons for my Gingerbread Man. You could also easily use buttons or crochet tiny circles instead.
I also made one that I used a chenille stem for a scarf instead of crocheting one. I also used button for eyes instead of the safety eyes. There are so many options, you just do basically whatever you like.

I personally like the look of the safety eyes better than the buttons, but I actually forgot that I had safety eyes when I made the first one, lol. And the chenille stem was actually my little brothers idea. Which wasn’t a bad idea, I actually really liked it.
Overview of the Gingerbread Man Pattern
The pattern uses some basic crochet stitches like chain stitches and single crochet stitches. The body itself is made in 2 separate pieces. You will first make the 2 legs and then join them and work the piece in flat rows back and forth.
Repeating the exact same process for the second piece and then stitching them together and stuffing it as you go.
I used Hobby Lobby’s I Love This Yarn but any other #4 worsted weight yarn will work great for this project. You will need either a light beige yarn or a brown yarn for the body of the gingerbread and then just some scrap yarn for the scarf and mouth.
You can use little 1/2” pom poms for the gingerbread or you could use small white buttons and hot glue them on. You might could possibly use fabric glue although I have never used it before, I just like to use hot glue.
You will also need a G / 4 mm hook and a few other small things like scissors and a yarn needle.

PIN this pattern to save for later!
Are you a visual learner? Then watch my Youtube video for this pattern.
Follow me on Social Media for more Patterns!
Check out some of my other patterns!
- C2C Snowman Blanket
- Gingerbread Ornament
- Christmas Tree Afghan
- Rudolph Ornament
- Snowman Ornament
- Bulb Covers
- Gingerbread Cup Cozy
- Snowman Coasters
- Santa Claus Hat
Pattern
- You can purchase the ad-free, downloadable, printable PDF pattern in my Etsy shop Here Thank you so much for your support!
- Save to your Ravelry Queue Here
- Pin to Pinterest to save for later Here
- Subscribe to my Youtube channel Here
Things you will need:
- I Love this Yarn in Toasted Almond and scrap yarn of Red and White
- G / 4.00 mm Crochet Hook
- Yarn Needle / tapestry needle
- Scissors
- 1/2” Pom Poms or Buttons
- 12 mm Safety Eyes or Buttons
- Hot Glue Gun
Finished Size – Gingerbread measures approx. 8” tall
Notes:
- Gingerbread is made in 2 pieces, a front piece and an identical back piece.
- Sew the 2 pieces together, stuffing as you go along to create the gingerbread.
- I used tiny pom poms for the cheeks and buttons. You can find them at any craft store. You could use buttons or even crochet tiny circles instead.
Abbreviation:
- ch = chain
- sc = single crochet
- hdc = half double crochet
- fsc = foundation single crochet
- sc2tog = single crochet 2 stitches together
- mc = magic circle / magic ring
- t = turn
- st = stitch (es)
- Sl st = slip stitch
Go!
Legs – Make 2
Row 1: ch 7, sc in 2nd st from hook and in each ch st across (6)
Row 2: ch 1, t, sc across (6)
Row 3: ch 1, t, sc2tog, sc in 2 st, sc2tog (4)
Row 4: ch 1, t, sc across (4)
Row 5: ch 1, t, sc2tog twice (2)
Row 6: ch 1, t, sc2tog (1)
Cut yarn. Repeat row 1-6 for the second leg.

Row 7: Attach yarn to one leg and sc in the 6 st across the wide end of the leg and continue and sc across the other 6 st on the other leg (12)

Row 8: ch 1, t, sc across (12)
Row 9: ch 1, t, sc 5 st, sc2tog, sc 5 st (11)
Row 10-11: ch 1, t, sc across (11)
Row 12: ch 1, t, sc2tog, sc 7, sc2otg (9)
Row 13-14: ch 1, t, sc across (9)
We will now add the arms on row 15
Row 15: ch 6, t, sc in 2nd ch from hook and in each ch sp and sc across the body


To do the other arm, you are going to do something like a foundation single crochet. Insert your hook in the space below your last sc

yarn over, pull through 1st st

Yarn over and pull both loops. 1 stitch made.

Work 4 more Foundation single crochet. You should have 19 st at the end of this row

Row 16-17: ch 1, t, sc across (19)
Row 18: ch 1, t, sc 7 st, hdc 5 st, sc 7 st (19)
Cut yarn. Attach yarn on the very 1st hdc st. You will start making the head.
Row 19: ch 1, sc in each of the 5 hdc (5)

Row 20: ch 1, t, 2 sc, sc 3 st, 2 sc (7)
Row 21: ch 1, t, 2 sc, sc 5 st, 2 sc (9)
Row 22: ch 1, t, 2 sc, sc 7 st, 2 sc (11)
Row 23-25: ch 1, t, sc across (11)
Row 26: ch 1, t, sc2tog, sc 7 st, sc2tog (9)
Row 27: ch 1, t, sc across (9)
ow 28: ch 1, t, sc2tog, sc 5 st, sc2tog (7)
Row 29: ch 1, t, sc2tog, sc 3 st, sc2tog (5)
Row 30: ch 1, t, sc2tog, sc 1 st, sc2tog (3)
ch 1, do NOT turn and evenly sc around the whole Gingerbread
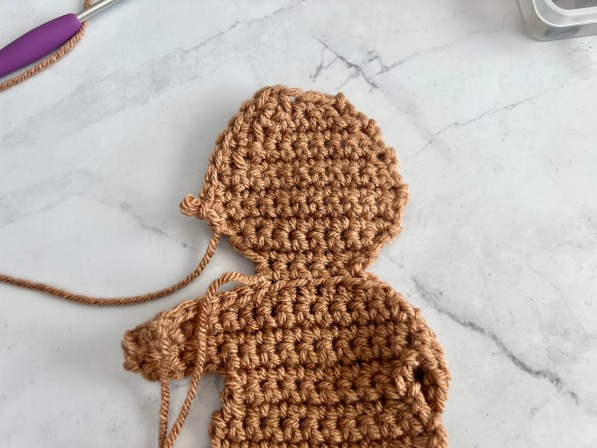

Repeat Row 1 – 30 once more. Making sure to single crochet around the 2nd one also, leaving a long tail on it to use to stitch around the edges.

Go ahead and place your safety eyes on one piece. I placed mine between rows 26-27 about 3 stitches apart
Start sewing the 2 pieces together, lightly stuffing as you go. Once closer to the end, stuff all the way and close it up.


Mouth – with white yarn
Ch 8, weave in ends.
Hot glue the mouth on and glue on the little red poms on each side
You can go ahead and glue on the white poms down the belly too
Scarf – with red yarn
ch 50, sc in 2nd ch from hook and in each ch st across. Weave in ends.

I hope that you have found this tutorial helpful! I love to see what everyone makes using inspiration from my blog! Whether you make this Crochet Gingerbread Man Free Pattern or something else from my blog, be sure to tag me @okiegirlblingnthings on Instagram so I can see!
Happy Crocheting!


Did you love this craft?
Make sure to comment below so we can chat about it! Or follow on your favorite social network for even more patterns and tutorials.