
This post may contain affiliate links. I may earn a small commission off of at NO extra cost to you. For more info, view my Privacy Policy.
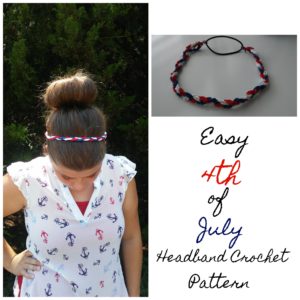
I wear headbands a lot. And, by a lot, I mean probably 95% of the time. Yes, during the summer you need a headband to keep those pesky little fly away hairs from bugging you to death but you also need a thin headband. Thick, bulky headbands just won’t do it.

This headband is made with Lion Brands 24/7 Cotton yarn and the colors coordinate beautifully for 4th of July. I also attached a ponytail holder to the headband so it will stretch to fit most adult heads. This is a quick and easy project that works up in like 20 minutes.
(And, you guys, Lion Brand is having a sale on their 24/7 cotton yarn. 25% off every skein in all the colors! That makes them $3.74 a skein.
Sorry guys, but this sale has ended. You can still Shop for them here
This headband is made with 3 pieces of chain stitches. So all you need to know is how to chain. I said it was easy. I braided the 3 pieces together and if you don’ t know how to braid, I took step by step photos.
Pattern
- You can purchase the ad-free, downloadable, printable PDF pattern in my Etsy shop Here Thank you so much for your support!
- Save to your Ravelry Queue Here
- Pin to Pinterest to save for later Here
- Subscribe to my Youtube channel Here
Things you will need:
- 1 skein each of Lion Brand 24/7 Cotton in Red, White, and Navy
- H / 5mm Hook
- Yarn Needle
- Ponytail Holder
Abbreviation:
- ch = chain

Go!
Pattern:
Make 3. 1 in red, 1 in white and 1 in navy.
Make sure to leave long tails on your chain pieces.
Ch 50. Cut yarn and pull through loop.
Now, we will knot the 3 pieces together so we can braid them.
Line all 3 pieces up evenly

Knot only 1 end and knot it as close to the start of the chains as possible


You may need to lay something on the ends to keep you yarn still, I used my skeins of yarn. Now start braiding the chain pieces.

#1. Take the piece on the right and cross it over the piece in the middle.

#2 Now, take the piece on the left and cross it over the middle piece

Continue repeating steps 1 & 2 until you have reached the end of the chains

Tie a knot at this end like you did the other end.
Now, tie the tails on to the ponytail holder with a knot.
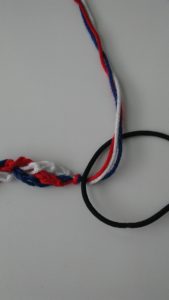

Repeat with the other end on the other side of the ponytail holder

Now, you just need to weave in the ends and your finished. Take one strand of yarn and knot it right above the 1st knot

Weave the end up the chain a little ways and cut the yarn. Repeat with the other 5 ends.


And that’s all there is to it. Be sure to like and follow me on social media to keep up with all my new designs!


Did you love this craft?
Make sure to comment below so we can chat about it! Or follow on your favorite social network for even more patterns and tutorials.