
This post may contain affiliate links. I may earn a small commission off of at NO extra cost to you. For more info, view my Privacy Policy.
Are you ready to actually start knitting? Yay! I’m glad because I will be showing you how to cast on. This means that I will be showing you how to get your yarn neatly wrapped around your knitting needles.
If you still need to get your knitting needles and yarn, then you may want to check out my 1st part to this series HERE
I will be showing you how to do the ‘Knit Cast On’. This is the simplest cast on, in my opinion, for a beginner to learn. This is definitely the way I’d recommend a beginner to learn how to cast on.
If you are thinking, ‘Is there more than one way to cast on?’ Yes, there are many different ways to learn to cast on when knitting. Each way has its own feel and purpose. Some cast ons are meant to be super stretchy, great for hats and sweaters. Some are meant to be tight and to NOT stretch for items that need to not be stretched out. The knitted cast on is a fairly stretchy cast on.
Cast on is usually abbreviated in patterns as ‘CO’. If you see CO in the very beginning of a knit pattern followed by a number, it’s telling you how many stitches you need to cast on. Like if it says, ‘CO 20 st’ that simply means to cast on 20 stitches onto your needles.
Most patterns will have a stitch key or guide that will tell you what letters stand for what.
PIN this tutorial to save for later!

For those of y’all that are visual learners, I have made a Youtube video showing you how to do this knitted cast on and the slip knot too.
How to Make a Slip Knot
The very first thing you will need to do so you can cast on to your knitting needles is to make a slip knot.
To make a slip knot, simply –
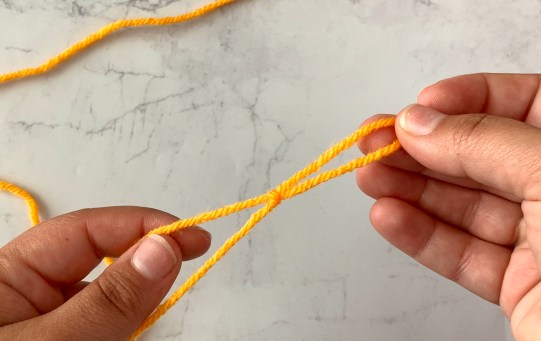
- Wrap your yarn around 2 fingers, twice (Pic #1)
- Pull the back piece over the front (Pic #2)
- Pull the piece that is now behind the other piece over it to the front again (Pic #3)

- Grab the piece in the back and gently pull
You have now made a slip knot.
Slip the loop onto one of the knitting needles and gently pull it closed. Don’t pull it super tight, just pull it until its to the needle, but you can still slide it up and down the needle very easily.

Knitted Cast on –
Now that you have made your slip knot and have it on your needle, it’s time to cast on the rest of your stitches.
Take the needle that has your loop on it in your left hand and hold the tail of the yarn with your fingers like this –

- Take you right hand needle and insert it in the loop under the left hand needle (Pic #1)
- Take your working yarn and wrap it around the right hand needle counterclockwise (Pic #2)
- Pull the yarn through the loop and pull up another loop (Pic #3)

Put this loop on your left hand needle. Pull the yarn to gently tighten the loop, but don’t pull it super tight. That’s one of the main things to remember, to be loose and not tight when you first start out.

2 loops on hook.

Now, how to cast on each additional stitch.
- Insert right hand needle in between the 2 stitches (Pic #1)
- Wrap the yarn around the needle (Pic #2)
- Pull the yarn through and make a loop (Pic #3)

Place the loop onto the left hand needle

Continue repeating those steps until you have as many stitches as you need.
Just keep inserting the right hand needle in between the 2 stitches closest to the end of the needle, wrapping the yarn around it, pulling up a loop and putting it on your needle.

When you have your cast on down and are ready to learn your 1st knitting stitch, head on over to Part 3 of my ‘Knitting 101’ Series to learn the Knit Stitch.
I hope that you have found this tutorial helpful! I love to see what everyone makes using inspiration from my blog! Be sure to tag me @okiegirlblingnthings on Instagram so I can see!
Save


Did you love this craft?
Make sure to comment below so we can chat about it! Or follow on your favorite social network for even more patterns and tutorials.